There are two key elements to crochet stitch symbol diagrams: what each symbol means, and how the placement of the symbol shows where one stitch is worked into another or in relation to another. If you are a knitter and are used to the grid diagrams used in knitting patterns, the first thing you will notice is that most crochet symbol diagrams do not adhere strictly to a linear grid. In crochet, the symbol diagrams follow the shape of the fabric and display the underlying geometric shape the pattern is based upon.
INDIVIDUAL SYMBOLS
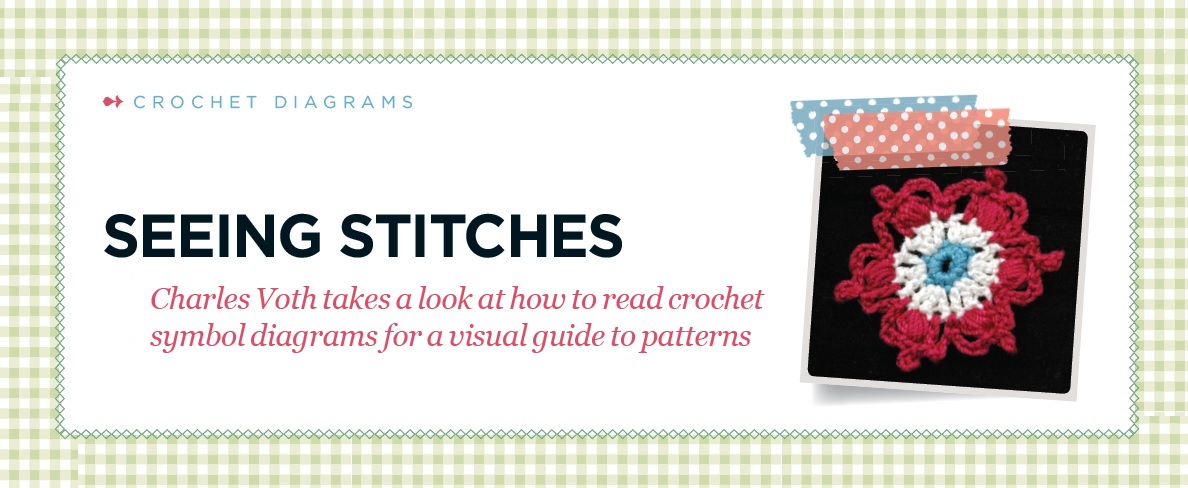
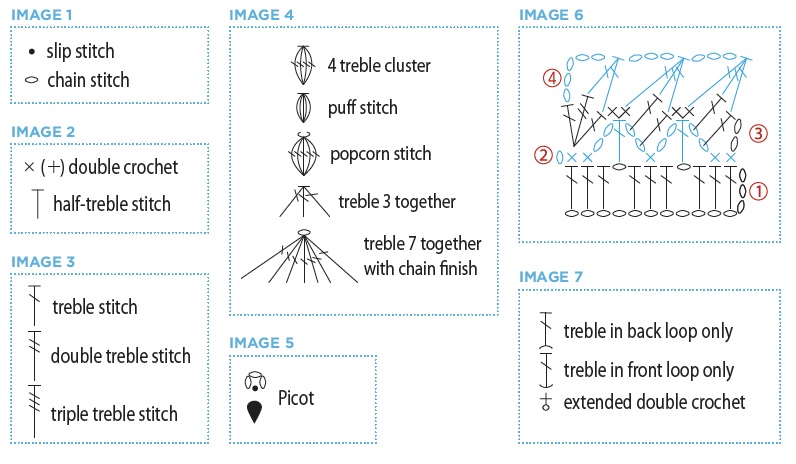
âž» In general, the symbols that represent different crochet stitches also illustrate the relative differences in size. The slip stitch (see Image 1), a simple dot, is the smallest symbol and basically shows that the smallest amount of yarn is used for this stitch as well. The chain stitch (see Image 1), an oval-based shape, is reminiscent of a chain-link on a plain necklace.
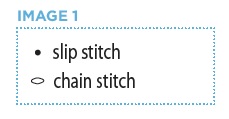
The double crochet stitch (see Image 2) is represented by either a plus-sign or a multiplication sign. The reason why there are two options will be explained further on. The half-treble stitch (see Image 2) is an upper-case letter ‘T’. The height of a half-treble symbol is half the distance between the top of a double-crochet stitch and a treble stitch, which clearly illustrates how the actual stitch height measures relative to these two other stitches.
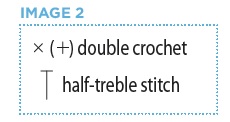
The treble stitch and its taller post stitches, the double treble, triple treble, etc (see Image 3) consist of an elongated letter ‘T’ crossed by either a smaller horizontal bar or a diagonal bar. The top cross bar symbolizes the 2 loops that form the top of the stitch and the horizontal or diagonal bars represent the yarn over hook strands that make the stitch taller.
COMBINATIONS AND GROUPS
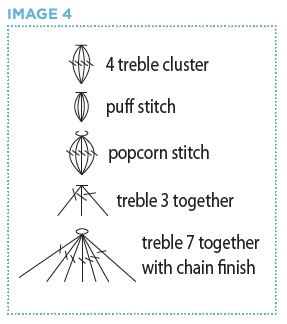
➻ Crochet stitches are often combined into clusters – puff stitches, popcorn stitches etc – and there are many other different ways to join stitches, including decreases. These combinations can be easily worked out from the symbols that represent them because they are built by grouping the individual symbols together. A cluster is represented by one horizontal bar at the height of the stitch used to make the cluster, a treble stitch, for example, and under it are placed as many curved lines crossed by diagonal bars as necessary to make the cluster (see Image 4 for a 4-treble cluster). A puff stitch is a cluster made of half-trebles, so it is slightly shorter, has no diagonal bars, and most frequently appears as a group of 5 half-trebles (see Image 4). A popcorn looks like a cluster except that it is topped with a curved line to symbolise how the hook is removed to draw the live loop through the top loops of the first treble of the group (see Image 4). A treble 3 together decrease looks like a fork with prongs that are crossed by diagonal bars. Each leg of the stitch symbol represents where the treble is worked; the top bar illustrates how each treble is worked incompletely to the last pull-through and then all the treble tops are worked together to form one stitch (see Image 4). Once in a while, a cluster or puff or decrease is so extensive that an extra chain is worked to hitch it up tightly and make it more symmetrical; this is symbolized with a chain stitch on top of the cluster (see Image 4).
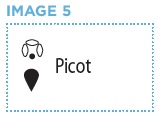
Another common grouping is a picot stitch. This looks like a circle of chains that are joined by either a slip stitch or a double crochet stitch (see Image 5). The number of chains in a picot varies from pattern to pattern. Occasionally, the whole picot is rendered as a black tear-drop shaped icon, to make it fit more easily into the diagram. Many different combinations have been invented by designers over time, but generally they can be drawn in a similar style to this. Some combinations are worked across more than one stitch and that is when the places you insert the hook become important to understand.
HOOK INSERTION POINTS
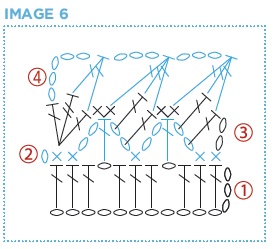
➻ At the beginning of a project, it is fairly standard to work into chain sts to create a foundation row or round. Even though the stitches are worked into a variety of combinations of strands of yarn from the chain stitch (back bump, front loop only, back loop only, back loop and back bump, etc), that much detail is not shown in the stitch diagram. Instead, the stitch is drawn with a millimetre or two of space between it and the chain into which it is worked (see Row 1 of Image 6). In subsequent rows or rounds, if there is a chain space created by a chain stitch, and a symbol is placed “hovering†over the chain symbol, this indicates that that stitch should be worked into the space and not into the chain itself (see Row 2 of Image 6). If the latter is necessary, it is either explained in the text or the vertical line of the stitch will intersect with the oval symbol to show the hook must be worked directly into the chain itself (see Row 3 of Image 6).In a similar manner, when a stitch is worked into another stitch, for example a double crochet is worked into a treble stitch, the small ‘x’ symbol will hover just over the crossed ‘T’. When using an ‘x’ is confusing visually because it looks like there are 2 insertion points, then the plus ‘+’ symbol is used for a double crochet instead. Clusters, puffs, and popcorn stitches have curved lines so that the insertion point is shared in the one stitch or space below it. Decreases on the other hand, with legs worked into different stitches or spaces have the ends of the ‘fork prongs’ placed just over the stitches into which they should be worked (see Row 4 of Image 6). Slip stitches also hover slightly over the stitch they are worked into or just beside the stitch when a round is being joined.
Variations and exceptions
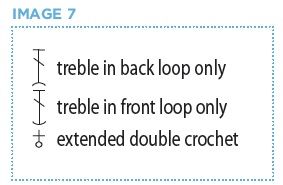
➻ The most common crochet stitches sometimes have a few changes made to them, but these can be illustrated with symbols as well. For example, when instructed to work a treble stitch in the back loop only of the next stitch, the diagram will show a little arc or bump either touching the base of the vertical line of the stitch, or centred just below it (see Image 7). When working into the front loop only, the little arc is open end up, which illustrates the curve of the front strand of yarn at the insertion point. A complete oval attached to the bottom of a stitch indicates an extended stitch (see Image 7 for an extended double crochet); in this example the plus ‘+’ sign must be used because it is connected to the chain that makes the extension.
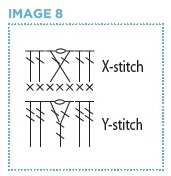
Y- and X-stitches and crossed stitches are illustrated clearly so that the place to insert the hook is clear and the height of the post is evident from the number of diagonal cross bars (see Image 8). Lastly, raised stitches are symbolised by a hook-shaped attachment to the bottom of the regular stitch symbol. The hook is inserted around the stitch below the working stitch (or multiple rows below it) from front to back to front or vice-versa at the place of the hook shape.
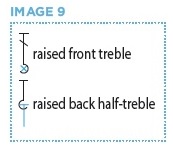
Illustrated here are a raised front treble stitch being worked around a double crochet, and a raised back half-treble stitch being worked into another half-treble (see Image 9).
Rows and rounds
âž» Depending on the publication, alternating rows/rounds may be shown in different colours or in different values of the same colour. This is to help the crocheter identify more easily where they are and how the different rows or rounds are formed in relation to each other. Occasionally the different colours represent different coloured yarns, but generally, coloured symbols are merely shown this way for clarity. Some publications have all black, or homogeneous colouration of symbols and resort to other symbols to direct the crocheter.
Arrows and labels
âž» Arrows and labels can be used extensively or very occasionally, depending on the designer. Occasionally starting points and finishing off points are indicated by tiny arrow heads, and long loopy lines indicated hook insertion points when these span several rows, or happen in unexpected situations. Row/round numbers and other labels keep the crocheter on track and help with shaping details, and sometimes with the use of stitch markers or unique stitch combinations.
Excerpts and joining
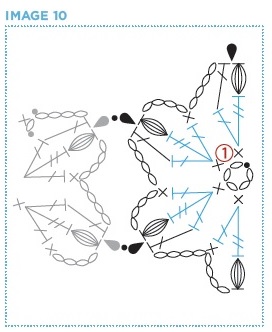
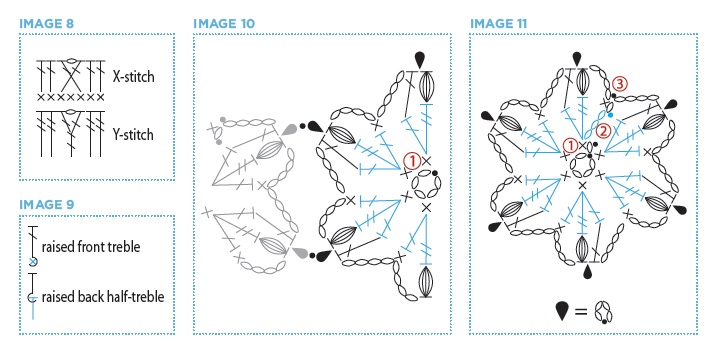
➻ For some patterns, where there is little shaping, the stitch diagram may just consist of the principal stitch pattern that is worked over a repeated series of stitches and rows. In this situation a partial diagram is shown, but the crocheter is expected to repeat the group of stitches across the whole of the work. Doilies and garments with extensive shaping often are charted out more completely, but even then a doily may have one sector of its circular shape charted out in full and the crocheter will be expected to repeat that group of stitches as they work their way around the piece. When items or motifs are joined, parts of the diagrams are often lightened or erased so that the crocheter can focus on how the joining takes place. At first these incomplete diagrams may be disconcerting, but with a little practice, it won’t be hard to focus on the joins where necessary and to refer to other diagrams for the missing stitches or pattern repeats (see Image 10).

Lesson
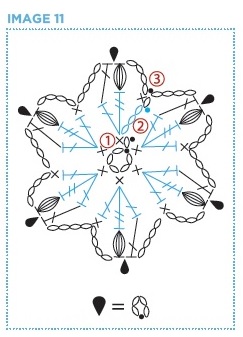
➻ Let’s dissect one small motif diagram and practise what we’ve covered here. Looking at Image 11, we can see that the motif is worked in the round and begins with a ring formed by 5 chains. The black dot indicates that the chain is slip stitched to the first chain. Then there is an individual chain to start the next round, followed by 6 double crochet stitches into the ring. Round 1 ends with a slip stitch in the first double crochet of the round. For Round 2, the first 3ch acts as a treble, and an additional double treble and treble are worked in the stitch at the base of the 3ch. Subsequently, a trio consisting of a treble, a double treble, and again a treble are worked into the next double crochet from the previous round. This is repeated around and the round ends with a slip stitch into the top of the 3ch. The third round has quite a bit going on in it, but it’s not too difficult. A single chain and double crochet into the st at the base of the chain starts things off. Then we chain 4, work a 5-half-treble puff stitch into the next double treble from the previous round. From here we work a picot stitch, which in this motif is 4 chains and a slip stitch into the base of the first chain, essentially the top of the puff stitch. Then we work a treble into the next stitch, chain 4 and work a double crochet in the next stitch. From the diagram, you can see which stitches repeat all the way around the motif. To finish the row, there is a slip stitch to the top of the first double crochet made and then the yarn is finished off and the ends are woven in, resulting in a cute miniature hexagon with puffy points.
Wrap-up
➻ We trust that those of you who have found stitch diagrams to be a murky jumble of lines and circles will now see with a little more clarity how crochet symbols actually represent fairly closely a finished piece, showing where and in which order all the stitches are worked. Once you understand the new ‘alphabet’ of crochet symbols and practise identifying where the insertion points of the hook are worked based on the placement of the symbols, you will be well on your way to solving the occasional puzzle that text instructions leave, but the diagrams clearly illustrate. And as more designers use diagrams and more international designers are discovered and showcased, you’ll be able to follow patterns that are basically in a language other than English. As you work through your favourite lace projects in this issue, we hope the diagrams will add to your enjoyment of crafting these lovely pieces.
Tell us your thoughts below.
Sorry, there have been no comments on this blog post yet - why not be the first to leave your opinion?
 Sounds of summer: From catwalk to high street - make your own on-trend wardrobe Read more...

Show your support for Inside Crochet Magazine by adding a button to your website. Simple copy and paste the HTML code below onto your website:
 Read Inside Crochet magazine on the go anywhere in the world with our digital downloads. Available now for iPhone, iPad, Kindle, Blackberry, Windows 8 & Surface!
Download now →